Django Messages Framework and Custom Tags
Sometimes it's necessary to display a message to the user in a quiet and clean manner. To do this, Django has given us the messages framework for cookie- and session-based messaging. After a form or other input is submitted we can quickly send a short message to the user without much effort at all. Here are all the documents related to the framework but I'm going to give you the quick version as well as some customization options and Bootstrap fixes.
The messaging framework is enabled by default when you create a new Django project so good job you're half way there! Now just add this bit of code to the top of any page you want messages to appear:
{% if messages %}
<ul>
    {% for message in messages %}
    <li{% if message.tags %}{% endif %}>{{ message }}</li>
    {% endfor %}
</ul>
{% endif %}
We have this in our base that is inherited by every page to allow the functionality to appear on the entire site. You need to have the loop even if you only have one message because it helps clear the message storage needs to be cleared. Now the great thing is you don't need to return messages when you render your template it will just come with it because of the context processor involved.
To add messages to your page, in your view:
from django.shortcuts import render_to_response
from django.template import RequestContext
from django.contrib import messages

def index(request):
    messages.add_message(request, messages.SUCCESS, 'We did it!')
    return render_to_response('my_app/index.html', context_instance=RequestContext(request))
That's it! You just have to have the line messages.addmessage(request, MESSAGETYPE, MESSAGESTRING) and then use the contextinstance in your render and you're done.
Bootstrap Compatability
To use this with Bootstrap you need to leverage the message.tags dictionary that returns values for each of the message levels. Here is our code that we use for messages in our Bootstrap site.<div id="messages">
{% if messages %}
{% for message in messages %}
<div class="alert alert-{{ message.tags }}">
<button type="button" class="close" data-dismiss="alert">×</button>
{{ message }}
</div>
{% endfor %}
{% endif %}
</div>alert-{{ message.tags }} class and add the Bootstrap close button. This works out of the box for all Django messages except messages.ERROR. This is because messages.ERROR returns 'error' which will make the alert class alert-error which is not what Bootstrap uses, they use alert-danger. To fix this, as well as add new message types, you need to alter your settings file by adding this variable:
from django.contrib.messages import constants as message_constants
MESSAGE_TAGS = {message_constants.DEBUG: 'debug',
                message_constants.INFO: 'info',
                message_constants.SUCCESS: 'success',
                message_constants.WARNING: 'warning',
message_constants.ERROR: 'danger',}messages.ERROR to return 'danger' instead of 'error'. This fixes our Bootstrap problem but you can see that now you can add new message constants not already created like messages.AWESOME or whatever else you'd like to make.
There is a lot more to the Django messages framework including error levels that I didn't get into here. Check out their docs for the low down on all the different things you can do with Django messages.
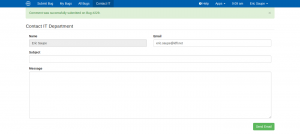
Here is a screenshot of an example I did just to test things out.